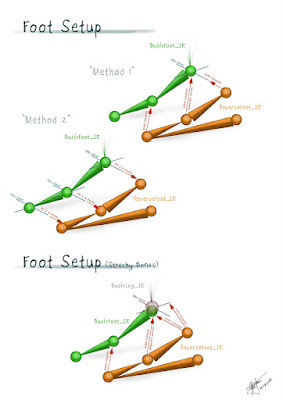
 After i search some videos and techniques i summarize reverse foot methods with drawing basic shapes. Green and orange bones must be snapped each other and i draw a little bit spaced for showing selection order and command. This techniques tested in maya but you can try at anothet software.
Method 1 : After you make basic foot bone and ikRP solver. You must create reverse foot bones opposite side of basic foot bone creation. Bone triangles show the creation way. In maya after you make both bones in side view you can select one bone and hit D for pivot point while holding D you can hit V key to snap other bone. After preapariton bones and ikRP solver. You can look at my sketch. Red arrows show the selection order and red text shows the command. For example first you select revese foot bone and hold shift to select basic foot ik solver. After that in maya menus select point constrain. You must do same for two reverse foot bones and basic foot bones.
Method 2 : You must create bones as described in method 1. This method is the simpliest way. Differences from method 1 are selection order and command. First you select basic foot ik solver and then select reverse foot bone as shown in the figure. After selection hit P on keyboard and it is ready for use!
Method 3 (for Strechy Bones) : Selection orders are same as method 1. Only one difference is you must do two point constrain commands for last bone of reverse foot. One for basic leg ik solver and other for basic foot bone.
You can do same techiques with locators or other dummy objects but reverse foot bones are best for rigging i think. I hope this sketch will help you for reverse foot.

No comments:
Post a Comment